Can't get stock Boot and Recovery image for your MediaTek android device?
Optimizing your android device takes a risk which either may improve your device a lot more or either make it perform worst. Now, most of the android users who encounter problems with their android device have difficulty to fix it. Why? Most beginners on android tweaking has the lack of knowledge on the proper way to backup their android devices' software, so whenever they encounter such issues to their device, they have the hard time looking of for a resolution especially if their device doesn't have much developers.

You can create / make your own stock boot.img and recovery.img for your MTK android device and use it as backup!
Yes, you don't have to depend for others or ask for them how to make one 'cause you can create your own stock boot.img and recovery.img for your MediaTek (MTK) devices by just following this long but simple steps that I will provide you.
Usually, you can't access the root system without Superuser rights that is why I made this article to help you with that.
How to get Stock Boot and Recovery image for any MediaTek device without root using SP Flash Tool and MTK Droid Tool
Will work any MediaTek device such as:
MT6595, MT6592, MT6589, MT6582, MT6577, MT6575, MT6572, MT65xx
Requirements:- Any Not Rooted or Rooted MediaTek-based device
- Windows computer
- USB Cable for your android device
- MTK USB Drivers - Download here recommended | mirror link
- MTK Droid Root and Tools - Get it here
- Smart Phone Flash Tool - Get it here (download the recommended or latest version)
- Scatter File for your MediaTek device - Get it here
- Notepad ++ - Get it here
Instructions:
Let us prepare for our tools first (that you have downloaded above). Install MTK USB Driver, you have to install all drivers included there, also, extract MTK Droid Root and Tools, SP Flash Tool to any location you are comfortable.
Make sure that you have made the Scatter File for your device (create your own using the link from the requirements above)

Connect your android device to your Windows computer, make sure you have installed properly all the drivers from MTK USB Drivers to avoid interruptions during this process. From your device, you must also enable USB Debugging on your device Settings -- Developer options, now your device must be auto-detected by your computer, if not, please properly install the USB drivers. It is also better if you set your android device to Airplane Mode.
Run SP Flash Tool.exe as administrator (right-click on it). After opening, click Scatter-loading.

Locate the scatter file of your android device. In my case, I have MT6577 from MyPhone a848i. Open and load the scatter file of your android device to the SP Flash Tool.
Locate the scatter file of your android device. In my case, I have MT6577 from MyPhone a848i. Open and load the scatter file of your android device to the SP Flash Tool.

It will look like the image below. Now, click Read Back tab.

From Read Back tab, click ADD twice so that we can add two tasks. Why? One is for getting the boot.img and the second one is for recovery.img. We can use them as stock backups and we can also use it as a basis for flashing CWM custom recovery and making a full ROM backup or dump.

Now, we will start the process. Let's start with the boot.img, double-click the first N/A.

A new window will appear asking to save the file. Name it as boot.img then click Save it to where you want to put the stock boot.img.

This is the most crucial part. You must enter the proper hex valuse for the Start Address and the Length for the boot image or else all you have done will not work.

To find out what to enter on the Start Address, first, find the scatter file that you have created before and edit/open it using Notepad ++ editor. Enter the hex code of BOOTIMG, in my case, my hex code is 0xf88000.

To find out what to enter on Length, connect your device to your computer via USB cable, make sure to enable USB Debugging from your device, then open MTK Droid Tools.exe on your computer and wait until your device was detected. From MTK Droid Tools, click Block Map.
Find the row for bootimg and you'll notice that it has the same start address "0000F88000" from what we have from the scatter file above "0xf8800" (you'll see that the first 4 zeroes are replaced by "0x").
Now to get the Length, length is equal to the Size but what we will enter is the significant digits only. In my case, since the size is 0000600000, the significant digit is 600000 and we have to replace the first 4 zeroes with "0x", so what we will enter in the Length from the SP Flash Tool is 0x600000

Now, in my case, it will look like this:

Make sure that the Start Address and Length has the same count or number of characters, otherwise, add a zero. For example you have a start address of 0x1234567 and you have a length of 0x123456, since they are not the same in count, you have to add zero on the length, so the length now will be 0x0123456. We have to add zero just in order to have the same character count.
If you are done getting the hex values, press OK.
Setting for boot.img is done, next will be for the recovery.img.
Double click on the second N/A, name it as recovery.img and save it to where you want to store the stock recovery.

Again, we have to enter the proper hex values for Start Address and Length.

You have to open again the Scatter file of your device and load your device from MTK Droid Tools to check the block map just like what we did on the boot.img.

In my case, my recovery has a Start Address 0x1588000 as you can see from the notepad, and I have the size of 000060000 from the block info, we will replace the first four zeroes with "0x" to get the Length, so my Length will be 0x600000.
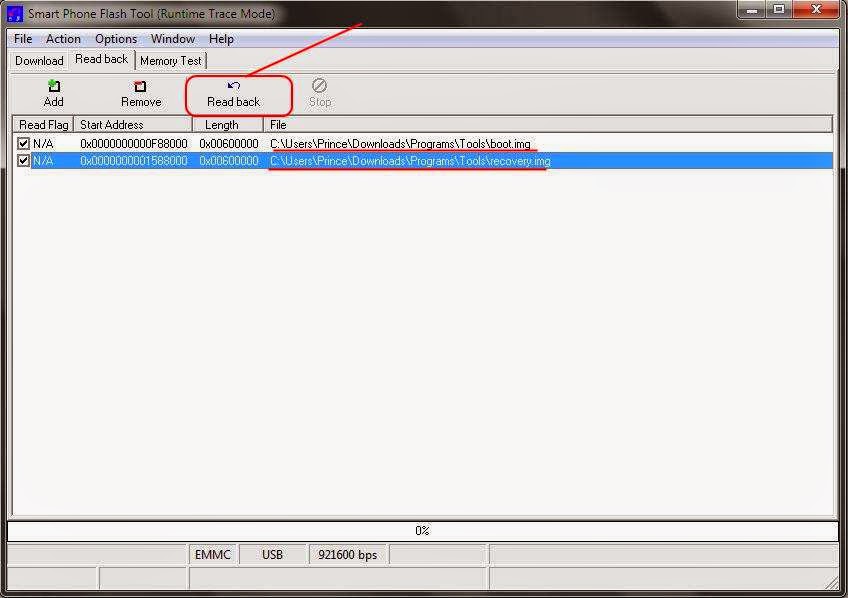
Since you have got the values, you have to enter it on the SP Flash Tool then press OK. Refer to the image below:

Now it is all set upped, you can see the locations where your boot and recovery image will be stored after we do the process.
Unplug the USB cable from your device and turn off your android device (you can do proper shutdown or remove the battery). When your phone is already turned off, press the Read back button from SP Flash Tool and immediately plug-in your phone with USB Cable.
Wait for 3-5 seconds and SP Flash Tool will detect your android device and it will load and create the stock boot and recovery image for your device. An OK alert message with a green circle will popup when the process is successful.
Navigate to the location where you have set the files to be store. In my case, you can see below that I have done it well. The boot image and the recovery image has the same file size.

Why they have the same file size? Let's check the block info from the MTK Droid Tools.

As you can see, both boot and recovery image has the same file size around 6mb therefore our file is correct.
We are now done from creating Stock images and we can use it to create a ClockworkMod (CWM) recovery and do full Stock ROM backup.
No comments:
Post a Comment