Showing posts with label Stock. Show all posts

Thursday, June 19, 2014

Cherry Mobile Omega Spectrum: Relight V Modified Stock ROM


Who wants enhanced native stock ROM on Omega Spectrum?


Like any other popular android smartphones, Cherry Mobile Omega Spectrum has been experiencing further customization and tweaks. Having an OEM device is just an awesome advantage. But for those who are tired of the custom ROM and want to try or go back to the original, factory, stock ROM, then, this enhanced or should a I say a more improved Stock ROM for Omega Spectrum.

omega spectrum stock rom

Relight V ROM, stock ROM for Omega Spectrum with custom ROM features


Just a relief for those who seek for a more stable, bug-free ROM, this Custom Relight stock ROM will let you experience the tweaked performance and highly-customizable features from which being boasted by any other custom ROM available. Want to try it out? Just feel free to have it your way.

How to get Relight V ROM installed on your Cherry Mobile Omega Spectrum


Proceeding below will let you flash the Custom Relight Stock ROM on your Cherry Mobile Omega Spectrum. With the great help of the S5J devs, the contributor of the ROM, we have put up all the steps and made it easier and more informative for you to make it work on your phone.

Disclaimer: Do the flashing at your own risk. We are not responsible for any possible issues it may cause. We are just here to help you.

Features:

  • Stock Interface
  • Deodexed
  • Tweaks added
  • Fixed previous stock issues
  • Zipaligned
  • Busybox
  • Inid.d supported


Things you need:


Installation:
  • Download the ROM "Relight_V_S5J-by-A_Aziz.zip" and put file on the root of your phone's SD card.
  • Boot to CWM recovery mode.
  • (Optional) Make a backup first if you don't have one. Follow this guide how.
  • Wipe data/factory reset, Wipe cache, Wipe dalvic cache
  • Go to mounts and Format System
  • Go to Install Zip from SD card
  • Select Relight_V_S5J-by-A_Aziz.zip and confirm to install.
  • Wait for the installation to be completed
  • Reboot system and it's done.

Enjoy the Relight V Modified Stock ROM on your Omega Spectrum!


credits to: advan s5j group, A_Aziz, Modder Anonymous


Feel free to leave your feedback. Furthermore, share us your screenshots. Thanks!

Wednesday, June 18, 2014

How To Dump / Backup ANY Android ROM

Getting full ROM backup or making a ROM dump on any android device


So, you came to fully backup your device or make a ROM dump? While thinking of my next article to write, I just thought of making a ClockworkMod (CWM) flashable zips for applying mods but considering the possible risks on our android device, I thought of creating a current ROM backup state in case something unwanted happens. Well, here it is.

android romdump backup
On this article, I’ll be presenting the various ways and the step by step guides on how to fully backup ROM state or create a ROM dump on any android device (smart phones or tablets). I have already created an article about the ways how to backup files, apps, etc. on any android device but from there, I was not able to discuss deeply how to do ROM backup or ROM dumping.

Ways to backup ROM and dump ROM applicable for any Android phones


If In case you don’t know, there are several ways to do a full ROM backup, that’s why I made this article so you can choose from the ways how to do it on your own which also varies from your device. So here are the ways which I already knew as of this time:


1. For MediaTek (MTK) devices, using SP Flash Tool and MTK Droid Root and Tools can help us make a full ROM backup or ROM dump.
2. For any device having ClockworkMod (CWM) recovery and TWRP, making a Nandroid backup can also provide one.
3. For all other android devices as long as it has ROOT access or Superuser rights, doing the simple ROM dumping method through romdump script for any partitions will work great.
  • We will discuss that below.

Easy way to dump or backup any android ROM


Disclaimer: We are not liable for any issues as a result of the procedure on your device. You are the one responsible of deciding to mess with your device so try at your own risk.

Things we need:

Instructions:

  1. Open Root Explorer and extract romdump_v82b.zip.
  2. Copy the extracted romdump file, then paste it on the root data/local/ folder.
  3. Open Terminal Emulator
  4. Type: su
  5. Type: chmod 04755 /data/local/romdump
  6. Type: /data/local/romdump
  7. The script will perform the ROM dump, just wait for it to be done.
  8. Once done, go to Root Explorer and find the romdump folder
  9. From there, you will see the backup / romdump you have made.


Congrats! Now, you have made a ROM dump of your device. Use it as a backup or as a base ROM for making custom ROMs.


credits: http://android.podtwo.com/romdump/


Tuesday, June 17, 2014

Flash MyPhone Ocean Pro Stock ROM via SP Flash Tool


MyPhone Ocean Pro Stock ROM for total restore


MyPhone Ocean Pro has the specs that can easily be modified and customized. An entry-level smartphone with a classy look has been mobbed by Filipinos and started to gain enough personnel to developed this awesome smartphone.

myphone ocean pro stock rom
For new users and new to tweaking the said device, it was already expected for them to make some mistakes on their first or trial attempts. If you can read some of this blog's article on modding, it is always a must to get your own backup of the ROM. But for MyPhone Ocean Pro users who haven't made the backup ROM, here's the Stock ROM for you. Even though I have made a separate article about the Stock ROM flashable through CWM, some of the users don't have it and some of the MyPhone Ocean Pro users can't boot to CWM, so for those who suffers this situation, today's article will be very friendly for you.

What this Stock ROM for MyPhone Ocean Pro can do?


  • Total factory restore
  • Fix most issues such as (invalid IMEI, soft-brick, hard-brick, boot-loops, etc.)
  • Fresh ROM


Download:

How to Flash?


credits: Hans Rob Mt


Tuesday, June 10, 2014

Stock ROM For MyPhone Iceberg Slim (CWM-Flashable)


Got tired of stock? Don't lose it MyPhone Iceberg Users, I tell you..


Getting rooted then followed by a custom recovery, it opened the opportunity for MyPhone Iceberg Slim users to replace their stock or original system experience new taste, tweak and customization. Just by searching on Google search engine for the mods and scripts, in an instant, you will be given tons of choices, it's a great thing yet the problem of choosing occurs.

myphone iceberg slim stock rom
In situations that you have MyPhone Iceberg Mini smartphone with you unfavoured, the things such as backup is as precious as gold. As soon as possible, any developers recommends you to have a backup of your current working ROM, so as a relief for those MyPhone Iceberg Slim users who don't have one, here's the treat for you.

At this juncture, get Deodexed Stock ROM made for MyPhone Iceberg Slim that is flashable through ClockworkMod (CWM) Recovery or any CWM-based custom recovery. Thanks to Mr. Remon Piamonte's work, Iceberg Slim users have lesser worries of flashing, testing tweaks and other stuffs alike.

Here's how to get Deodexed Stock ROM flashed on your MyPhone Iceberg Slim thru CWM recovery


Disclaimer: Flash the deodexed stock ROM on your MyPhone Iceberg Slim at your own risk. You, as the owner, has the full responsibility for any changes it will make to your device.

The things you need:

Steps:

Backup:
1. BACKUP ALL YOUR DATA FIRST (your contacts / SMS / APP). (Use Titanium Backup for backing up apps, while you can use Super backup to create a backup of your contacts and SMS).

Installation:

1. Comply the things needed. After downloading the Stock ROM (AROMA_STOCK_Agua_Iceberg_Slim_V0.13.zip), put it to your phone's SD card.

2. Reboot to recovery mode (When your phone is OFF, press and hold Volume up + Volume down + Power button and wait, then select Recovery by pressing Volume up)


3. Make a backup of your ROM, if you don't have one. You can follow this guide if you have CWM.

4. Do full wipe. Wipe data/factory reset, Wipe Cache, Wipe dalvic cache (for CWM users, find it in advance).

5. Go to Install Zip from SD card.

6. Choose AROMA_STOCK_Agua_Iceberg_Slim_V0.13.zip, then proceed to flashing.

7. Wait for it to complete. Reboot.


credits to:
Myphone, Amarullz for AROMA Installer, XDA forum, Yonip Dev Team
source:
https://www.facebook.com/notes/myphone-iceberg-slim-official-yonip_dev_team/stock-deodexed-flashable-rom/251145718407525


CWM-Flashable Stock ROM For MyPhone Ocean Pro

Already got ROM backup of your MyPhone Ocean Pro?


Probably, MyPhone Ocean Pro smartphone users like you have already rooted and installed ClockworkMod (CWM) Recovery, that made them capable of applying a lot of tweaks to their beloved smartphones. However, we all know the risks we take whenever applying some sort of mods, that could even break our devices and leave it unusable, if you are not knowledgeable of that matters, please try to understand what is rooting and what does it can do to your device.

myphone ocean pro stock rom

Stock ROM for MyPhone Ocean Pro


In order to secure our device's safety, a backup should always be prepared in case of worst situation. This time, here comes another treat to MyPhone Ocean Pro users, their very own Stock ROM flashable through Clockworkmod Recovery and other CWM-based custom recoveries.

How to flash MyPhone Ocean Pro Stock ROM in CWM


Without further a do, here's how to successfully go back to MyPhone Ocean Pro stock ROM by simply using the easiest method which is through flashing from CWM. When you are ready, please proceed to the procedures below.

Disclaimer: Flash the stock ROM version below at your own risk. Make a backup if you don't have one.

Stock ROM features:

  • Deodexed
  • Zipaligned
  • Init.d support
  • Pre-rooted
  • Data app support

Download


Installation:

1. Download the ROM (StockOpro.zip) and put it on your MyPhone Ocean Pro's SD card.
2. Boot in CWM Recovery.
3. Make a backup of your ROM if you don't have one. Follow this guide.
4. Wipe cache, Wipe data/factory reset, go to advance and Wipe dalvik cache, go to mounts and format system.
5. Select Install Zip From SD Card and choose and flash StockOpro.zip.
6. Reboot.


credits:
Hans Rob Mt for the stock ROM, Hans Taglucop, mtkdroidtools, xda forum, myphone ocean pro 

Sunday, June 8, 2014

How To Flash Stock / Custom Recovery Using SP Flash Tool


Having problems with flashing recoveries on your device? Android users like you might get some interest on today's article. As most of us, android users, who wants to tweak their phones, we can say that the mostly-used region when applying modifications is the recovery partition. But what if you can't get your recovery installed in your device? That's the question that we will going to find a solution.

Flashing a recovery is easier with the use of apps such as Mobile Uncle Tools, Rashr Recovery Tools, and other utility apps, also, we can perform image flashing through ADB or through terminal emulator but for Mediatek, there is one method which supposed to be the best method of flashing images but somehow quite took for granted, through SP Flash Tool is the method I am talking about. Some apps might not work in an MTK device, but with Mediatek's very own SP Flash Tool, it works like a charm!

mediatek recovery
Below is the complete guide how to flash a stock or  a custom recovery for any Mediatek device, but though from that fact, you must provide the proper image to be flashed to your device or else it will mess it up. We made up all the steps to make it easier for you to do this successfully. All you need is focus and a little brain.

How To Flash Stock/Custom Recovery Using SP Flash Tool


Only follow the steps provided. Applying the procedure means you are fully responsible for the possible outcome of your device. If you are confused, read the steps again, if you hesitate, do enough research.

Things you need:

  • PC/Laptop running Windows
  • MTK-based device: MT6595, MT6592, MT6589, MT6582, MT6577, MT6575, MT6572, MT6573
  • Scatter File for your MTK device - Get it here
  • SP Flash Tool - Get it here (download the recommended or latest version)
  • Drivers - Download here
  • USB Cable


Preparations:

Download and install the Drivers (click the Install bat file and wait for it to finish the installation so don't close it). Create your own scatter file if you don't have one, it differs from each MTK device. Download and extract SP Flash Tool. Finally the recovery (stock or custom/CWM/TWRP) which is made for your device (make sure it is named as recovery only not cwm_recovery, etc.), don't flash recovery that is not made for your device.

sp flash tool


Instructions:

scatter file

1. Open SP Flash Tools and click Scatter Loading, now select the scatter file of your device.


scatter loading

2. Make sure all boxes are NOT checked, if there's a check, remove it by clicking the check.

recovery

3. Now, click RECOVERY from the list. A new window will appear, find the recovery image that you want to flash or install and click Open.

recovery sp flash

4. It will now look like the image above. The RECOVERY is the ONLY one checked on the list and you can see the location of the recovery image that you are going to flash.

recovery sp flash tool

5. TURN OFF your android phone. When it is already off, click the Download button on the SP Flash Tool, then click Yes. After that, connect your switched-OFF phone to your computer using USB Cable.

recovery download

6. The tool will detect your phone and flash the recovery, if your computer can't detect your phone, re-install the Drivers that I have provided. Wait until a prompt with green circle will appear, that means the flashing is done successfully.

Congrats! You are done flashing the stock/custom recovery for your MTK-based device.


Saturday, May 31, 2014

Cherry Mobile Flare S2 Stock ROM

Get Stock ROM for your Cherry Mobile Flare S2


Having difficulties and worries with tweaking your Cherry Mobile Flare S2? Flashable Stock ROM might solve it for you. This article will be providing you the most available stock ROMs for your owned Flare S2 device, use it as a backup and fix most issues by simply following the given instructions.

Due to Cherry Mobile Flare S2's later existence, we only have few developments but it is a good way to start of. Temporarily, let's us enjoy what the device currently has.

cherry mobile flare s2 rom

Flare S2 Stock ROM flashable on SP Flash Tool


Before anything else, I will give a credit to Sotie Arlos Fuentes for sharing his contribution.

Advantages:
  • Backup
  • Can fix boot loop
  • Can fix hard brick
  • Restores Stock ROM state (including stock Boot and Recovery Image)
Disadvantage:
  • Requires PC or Laptop
  • Only flashable through SP Flash Tool
  • A bit dangerous so must be careful
Download Link:
How To Use? 

Requirements:
Stock ROM - download link above
Complete MTK Drivers - download here
SP Flash Tool - download here (either the latest or recommended version)

INSTRUCTION: Follow this guide below on how to RESTORE or flash the Stock ROM.
  • Visit this link (Proceed directly to the Restoring Stock ROM instructions)


Credits to:
Sotie Arlos Fuentes for the Stock ROM


Tuesday, May 20, 2014

How To Backup / Restore Stock ROM with SP Flash Tool

Looking for a Flash-able Stock ROM for your Android Phone?

After reading the comments and suggestions from this blog's previous articles, there are a lot of android users who are looking for a flash-able Stock ROM for their device, however, I don't have their kind of device in hand and it's impossible for me to create you one. But hey, I have an idea how will you able to get a Stock ROM for your MTK devices and you, yourself can make it on your own.

backup restore rom
There's a lot of MTK smartphone users out there most especially on local-branded smart phone users who have lots of worries on damaging their devices from tweaking it. Why? Lack of developers corresponds the number of development available for the device and we know for the fact that without backup such as ROM or a stock ROM, fixing most android problems such as soft bricks, boot loops, or even hard bricks are too difficult to handle.

Create your own Stock ROM for your MediaTek (MTK) Android Smartphone


Thanks to XDA members who contributed to MTK development, Mediatek smartphone users can now be able to create their own Stock ROM and use it as a backup whenever serious matters occur to their loved devices. With the use of prepacked tools, MTK android users no longer needs much developer for their device because they can be one.

How To Make, Backup and Restore Stock ROM Flashable with SP Flash Tool


On this article, AndroidHow will be guiding you how to make your own Stock ROM, use it as your own backup and restore it through flashing from SP Flash Tool. Why from SP Flash Tool? With SP Flash Tool, even a corrupted, hard-bricked android device can still be revived and fixed which was considered the best method of repairing any android software problem. 

On this tutorial, we will be using SP Flash Tool and MTK Droid Tools to successfully make a flashable Stock ROM for our MediaTek devices.

Requirements:
  • Any MTK android device running a Stock ROM. (Note: if your device was rooted, then you'll get a rooted Stock ROM, otherwise if your device does not have root access, you'll get unrooted Stock ROM):

MT6595, MT6592, MT6589, MT6582, MT6577, MT6575, MT6572, or any MT65xx


Preparations (Please Read):

Make sure to prepare all the necessary requirements before proceeding or else, proceeding below is just a waste.

You must have the device in hand with CWM recovery. Download and install the MTK USB Drivers in your computer, it contains 6 other USB drivers needed to detect your device. Also, you must download MTK Droid Tools and SP Flash Tool, extract them to any location or folder you are comfortable of accessing. If all are ready, let's proceed to the instructions.


Instructions:

Creating Stock ROM Backup


First, reboot your MTK android device into CWM Recovery and connect your device to your computer using USB Cable.

cwm recovery

From your computer, Open MTK Droid Tools.exe, run it as administrator. Wait for your device to be detected since you have installed the USB drivers. You will notice that color on the lower-left corner of the tool will turn cyan-blue.

mtk droid tools

On MTK Droid Tools, click on root, backup, recovery tab and click the Backup button to start full stock ROM backup.

mtk backup

Wait for the tool to backup your whole Stock ROM. You can see that the ROM backup will be saved on \MtkDroidTools\backups.

backup android

Wait until a prompt will appear asking you "Pack-up the backup" or something like that, press NO, it will just compress the backup you have made and what we need is the uncompressed ROM backup.

Check the status message and check is the task is completed. "Task ended".

It is not done yet, we have to prepare this backup to make it flashable through SP Flash Tool. To do it, click on To prepare blocks for Flash Tool.

flash backup

A new windows will appear asking fol a .md5 file of the backup. So navigate to the MTK Droid Tools folder where your backup is found. Open the backup that your have created earlier and select the files.md5 click OPEN.
flash rom backup

Wait for MTK Droid Tools to copy the files for SP Flash Tool, check the status messages until the copying is complete.

stock rom backup

When the tool is done, you have now created the Stock ROM backup of your device!


How To Restore the Stock ROM of your MTK device?


Open SP Flash Tool.exe, run as administrator. Load the scatter file (click scatter-loading) which you have prepared from MTK Droid Tools to be flashable through SP Flash Tool. It can be found in the !Files_to_FlashTool folder of your Stock ROM backup (only if you have just made a backup) or from where you have saved or placed the Stock ROM. But in my case, I saved it on !Files to FlashTool folder.

sp flash tool scatter

After you loaded the scatter file, it will look like the image below. All must checked except for Cache and User Data, and most importantly, do not check Preloader and DSP_BL or else you'll brick it. Those checked partitions will be restored, make sure not to touch or move the backup files so that your phone will be restored in your previous stock ROM, also to avoid boot loops and bricking.

As you can see, the Stock ROM partition backups are found on its specific locations under location column. If the locations do not appear (except for CACHE and USRDATA), the backup stock ROM is not in the proper place. To fix that, you must move the files of the stock ROM to the same location where the Scatter file is stored.

To restore or flash the Stock ROM backup, first, turn OFF your MTK android device and remove the USB cable. If your phone was already turned OFF, click Download from SP Flash Tool, a prompt will appear, just click YES. Immediately connect your turned OFF device to your computer via USB Cable.

download rom

Wait for the tool to detect your device and restore the Stock ROM that you have made. An alert with a green circle appears after successfully downloading the ROM.

download ok

Done! You have successfully restored the stock ROM.


Monday, May 19, 2014

How To Make / Backup Stock Boot and Recovery Image

Can't get stock Boot and Recovery image for your MediaTek android device?


Optimizing your android device takes a risk which either may improve your device a lot more or either make it perform worst. Now, most of the android users who encounter problems with their android device have difficulty to fix it. Why? Most beginners on android tweaking has the lack of knowledge on the proper way to backup their android devices' software, so whenever they encounter such issues to their device, they have the hard time looking of for a resolution especially if their device doesn't have much developers.

stock boot recovery image
Good news for MediaTek android users because this article will provide you the way how to solve your problems with your android devices' Stock Boot.img and Recovery image which you could use if something bad might happen, and you can use it to create a CWM recovery to do flashing stuffs and do full ROM backup.

You can create / make your own stock boot.img and recovery.img for your MTK android device and use it as backup!


Yes, you don't have to depend for others or ask for them how to make one 'cause you can create your own stock boot.img and recovery.img for your MediaTek (MTK) devices by just following this long but simple steps that I will provide you.

Usually, you can't access the root system without Superuser rights that is why I made this article to help you with that.


How to get Stock Boot and Recovery image for any MediaTek device without root using SP Flash Tool and MTK Droid Tool


Will work any MediaTek device such as:

MT6595, MT6592, MT6589, MT6582, MT6577, MT6575, MT6572, MT65xx

Requirements:
Instructions:

Let us prepare for our tools first (that you have downloaded above). Install MTK USB Driver, you have to install all drivers included there, also, extract MTK Droid Root and Tools, SP Flash Tool to any location you are comfortable. 
Make sure that you have made the Scatter File for your device (create your own using the link from the requirements above)

scatter file

Connect your android device to your Windows computer, make sure you have installed properly all the drivers from MTK USB Drivers to avoid interruptions during this process. From your device, you must also enable USB Debugging on your device Settings -- Developer options, now your device must be auto-detected by your computer, if not, please properly install the USB drivers. It is also better if you set your android device to Airplane Mode.

Run SP Flash Tool.exe as administrator (right-click on it). After opening, click Scatter-loading.
sp flash tool

Locate the scatter file of your android device. In my case, I have MT6577 from MyPhone a848i. Open and load the scatter file of your android device to the SP Flash Tool.

mt6577 scatter file

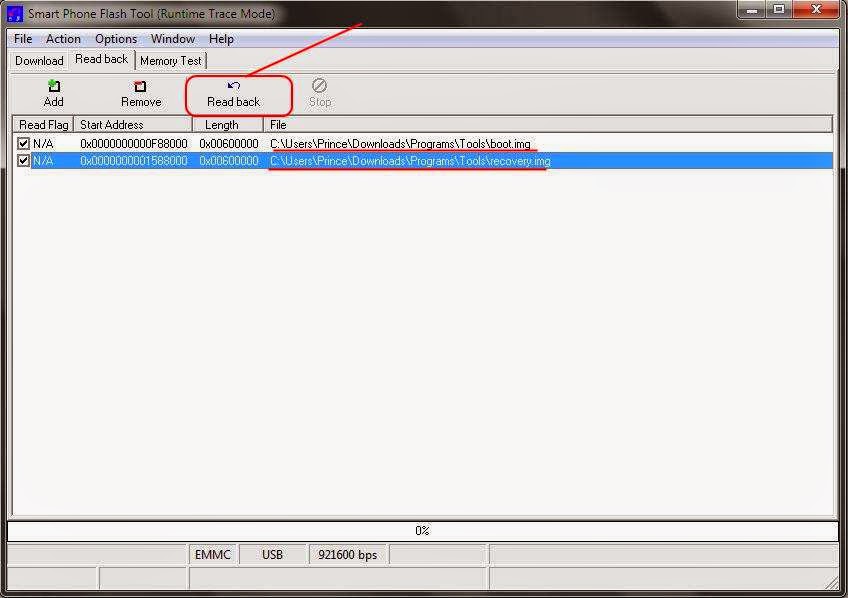
It will look like the image below. Now, click Read Back tab.

smart phone flash tool

From Read Back tab, click ADD twice so that we can add two tasks. Why? One is for getting the boot.img and the second one is for recovery.img. We can use them as stock backups and we can also use it as a basis for flashing CWM custom recovery and making a full ROM backup or dump.

spf tool

Now, we will start the process. Let's start with the boot.img, double-click the first N/A.
boot image

A new window will appear asking to save the file. Name it as boot.img then click Save it to where you want to put the stock boot.img.

stock boot image

This is the most crucial part. You must enter the proper hex valuse for the Start Address and the Length for the boot image or else all you have done will not work. 

flash boot image


To find out what to enter on the Start Address, first, find the scatter file that you have created before and edit/open it using Notepad ++ editor. Enter the hex code of BOOTIMG, in my case, my hex code is 0xf88000.

boot.img

To find out what to enter on Length, connect your device to your computer via USB cable, make sure to enable USB Debugging from your device, then open MTK Droid Tools.exe on your computer and wait until your device was detected. From MTK Droid Tools, click Block Map.

Find the row for bootimg and you'll notice that it has the same start address "0000F88000" from what we have from the scatter file above "0xf8800" (you'll see that the first 4 zeroes are replaced by "0x"). 

Now to get the Length, length is equal to the Size but what we will enter is the significant digits only. In my case, since the size is 0000600000, the significant digit is 600000 and we have to replace the first 4 zeroes with "0x", so what we will enter in the Length from the SP Flash Tool is 0x600000

block info

Now, in my case, it will look like this:

flash boot.img

Make sure that the Start Address and Length has the same count or number of characters, otherwise, add a zero. For example you have a start address of 0x1234567 and you have a length of 0x123456, since they are not the same in count, you have to add zero on the length, so the length now will be 0x0123456. We have to add zero just in order to have the same character count.

If you are done getting the hex values, press OK.

Setting for boot.img is done, next will be for the recovery.img.
Double click on the second N/A, name it as recovery.img and save it to where you want to store the stock recovery.

recovery.img

Again, we have to enter the proper hex values for Start Address and Length.
flash recovery

You have to open again the Scatter file of your device and load your device from MTK Droid Tools to check the block map just like what we did on the boot.img.

recovery image

In my case, my recovery has a Start Address 0x1588000 as you can see from the notepad, and I have the size of 000060000 from the block info, we will replace the first four zeroes with "0x" to get the Length, so my Length will be 0x600000.

Since you have got the values, you have to enter it on the SP Flash Tool then press OK. Refer to the image below:

sp flash recovery

Now it is all set upped, you can see the locations where your boot and recovery image will be stored after we do the process. 

Unplug the USB cable from your device and turn off your android device (you can do proper shutdown or remove the battery). When your phone is already turned off, press the Read back button from SP Flash Tool and immediately plug-in your phone with USB Cable.

boot recovery image

Wait for 3-5 seconds and SP Flash Tool will detect your android device and it will load and create the stock boot and recovery image for your device. An OK alert message with a green circle will popup when the process is successful.

Navigate to the location where you have set the files to be store. In my case, you can see below that I have done it well. The boot image and the recovery image has the same file size.

boot.img recovery.img

Why they have the same file size? Let's check the block info from the MTK Droid Tools.
boot recovery size

As you can see, both boot and recovery image has the same file size around 6mb therefore our file is correct.

We are now done from creating Stock images and we can use it to create a ClockworkMod (CWM) recovery and do full Stock ROM backup.

Friday, May 16, 2014

Stock ROMs / Firmware for MyPhone Agua RIO


Good day AndroidHowdies! If you are looking for a stock ROM or official firmware for your MyPhone RIO, then, you have came to the right place.

Here are the compilation of Stock Firmwares / ROMs for MyPhone Agua RIO which you can use as a base for creating you own custom ROM or just to get a fresh ROM without mods or anything.

rio stock rom
Thanks to our very important contributors namely Sir Edmhar Laoag and Sir Red for helping us and sharing their works for the development of the said device.

Disclaimer: Always flash at your own risk!  We, as well as the contributors and the developers, are not responsible for bricking your devices or any possible damage it may cause.

Golden Rule: Always backup before flashing.

Stock ROMs Flashable through CWMR / TWRP


Stock ROMs / Firmwares for MyPhone RIO S5500


Deodexed Stock ROM - ported from Explay Fresh Stock ROM, credits to Sir Edmhar
  • Removed bloatwares
  • Added New Gesture - Wave to change picture while browsing in Gallery.
  • Zipaligned
  • Can install apps to SDcard
  • Already Swapped SD to Phone Storage
  • Smoother than V1.16
  • Fresh, no tweaks and mods
  • Can be used as a Base ROM

Stock ROMs / Firmwares for MyPhone RIO S5501


Deodexed Stock ROM v1.17 - Mirror Link - credits to Sir Red

  • Unrooted
  • Deodexed
  • Zipaligned

Deodexed Stock ROM - ported from Explay Fresh Stock ROM, credits to Sir Edmhar
  • Removed bloatwares
  • Added New Gesture - Wave to change picture while browsing in Gallery.
  • Zipaligned
  • Can install apps to SDcard
  • Already Swapped SD to Phone Storage
  • Smoother than V1.16
  • Fresh, no tweaks and mods
  • Can be used as a Base ROM
  • After flashing this ROM, immediately flash this UPDATE v1.2 from recovery.
          • Added Browser
          • Added Playstore
          • Replace Explay Camera to Stock Camera

How to Flash From Custom Recovery?

To fully understand what is flashing, visit this article which discusses flashing apps, mods, and ROMs.

Requirements:

Instructions:
1. Download the Stock ROM and place it to your phone's SD card storage
2. Reboot your phone to Recovery mode (CWMR or TWRP)
3. Do Wipe Data/Factory Reset, then Wipe Cache Partition, go to advance and Wipe Dalvik Cache
4. Install Zip from SD card
5. Choose Zip from SD card, select the Stock ROM that you have downloaded.
7. Select YES to Install
8. Wait until its through
9. Reboot
10. DONE!

For Flashing UPDATE v1.2

Instructions:
1. Download the UPDATE v1.2 and place it to your phone's SD card storage
2. Reboot your phone to Recovery mode (CWMR or TWRP)
3. Install Zip from SD card
4. Choose Zip from SD card, select the "UPDATED v1.2" that you have downloaded.
7. Select YES to Install
8. Wait until its through
9. Reboot
10. DONE!


Credits: XDA, MyPhone Groups, Edmhar Laoag, Red