Showing posts with label Tools. Show all posts

Monday, June 2, 2014

Play High-End Games with GLTools (Graphics Optimizer)


Howdy! So, you have issues with playing games huh?! Probably you are having a budget smartphone or tablet that can't really support high-end games like Real Racing 3, NBA 2k14, Dead Trigger, etc. Fortunately, android developers heard your problems and develop an app capable of making lower-end android device feel the high-end gaming experience.

gltools 2
Let me introduce GLTools, an app that allows customization of resolution and graphics rendering of apps for optimizing gaming experience. With GLTools, it will allow you to play games which actually requires higher specs or rather play games with lesser lags and FC (force close). If you are familiar with what this app can do, it might be you have heard of Chainfire3D, but, this one supports any android versions starting from android 2.2 and above with lesser issues.

What this app can do? Check out below:

  • Change resolution and rendering bitness in any app, even if it doesn't support that by default.
  • Change GPU name and enjoy enhanced graphics even on a noname low-end GPU.
  • Take full control over textures: now you can decompress/recompress them (even if your GPU doesn't support that texture format) and resize. Note that decompression feature is available only if you'll install a plugin (internet is required to do that)
  • Optimize shaders on-the-fly for optimal performance (the same optimizer is used in Unity3D engine by default)
  • Enable MSAA or CSAA in any app to improve graphics quality (make sure that your GPU supports that)
  • Measure gained performance with a nice onscreen FPS counter (or you can output FPS information to Logcat if you are a pro)
Additional Notice
  • Root and a writable /system partition are required! - Follow this guide to root your device.
  • OpenGLES 2.0-compatible GPU + ARM processor, x86 processors are not supported (Galaxy Tab 3 for example)

How To Use GLTools? Understanding the Settings


Caution: As you have read, it can support android versions 2.2 and above, however, most users of this app reported and recommended that it works best and safer on rooted Android 4.1 to 4.3 Jelly Bean devices with custom recovery. If you're device does not, it is your choice to use this. GLTools is not 100% stable.

Disclaimer: Use this app at your own risk. We are not liable for any damage it may cause.

Make sure you have rooted your device. Also, just a reminder, it works best on Jelly Bean devices.

Before anything else, backup your ROM just in case somethings went wrong.

1. Download and install GLTools. Download the Free Version or Paid Version.

2. Open GLTools, read and understand the check list below before checking all the check boxes. Select Install. Wait for your device to reboot. There will be an uninstaller of the GLTools flashable through custom recovery, it can be found on your SD card.

3. Again, open GLTools then select the Game you want to play.

gltools

4. Check Enable custom settings for this

Here's the tweaking part

5. Check Force 16 bit rendering. (it reduces lighting and shading effects but not much a biggie in the graphics)

6. Check Optimize GLSL shaders. (for optimizing OpenGL shading responsible for color, texture, structure)

7. Enable and set Downscale texture as what you like. (It reduces the texture therefore, lesser lag)

8. You may want to Use fake GPU info. (Can also improve game graphics quality and performance)

9. Now, it's done. Play any games you wanted.

How to completely uninstall GLTools?


1. Simply reboot to custom recovery.

2. install zip from SD card then choose uninstall-gltools.zip

3. Wait and GLTools will be uninstalled.


Credits to XDA


Tuesday, May 20, 2014

How To Backup / Restore Stock ROM with SP Flash Tool

Looking for a Flash-able Stock ROM for your Android Phone?

After reading the comments and suggestions from this blog's previous articles, there are a lot of android users who are looking for a flash-able Stock ROM for their device, however, I don't have their kind of device in hand and it's impossible for me to create you one. But hey, I have an idea how will you able to get a Stock ROM for your MTK devices and you, yourself can make it on your own.

backup restore rom
There's a lot of MTK smartphone users out there most especially on local-branded smart phone users who have lots of worries on damaging their devices from tweaking it. Why? Lack of developers corresponds the number of development available for the device and we know for the fact that without backup such as ROM or a stock ROM, fixing most android problems such as soft bricks, boot loops, or even hard bricks are too difficult to handle.

Create your own Stock ROM for your MediaTek (MTK) Android Smartphone


Thanks to XDA members who contributed to MTK development, Mediatek smartphone users can now be able to create their own Stock ROM and use it as a backup whenever serious matters occur to their loved devices. With the use of prepacked tools, MTK android users no longer needs much developer for their device because they can be one.

How To Make, Backup and Restore Stock ROM Flashable with SP Flash Tool


On this article, AndroidHow will be guiding you how to make your own Stock ROM, use it as your own backup and restore it through flashing from SP Flash Tool. Why from SP Flash Tool? With SP Flash Tool, even a corrupted, hard-bricked android device can still be revived and fixed which was considered the best method of repairing any android software problem. 

On this tutorial, we will be using SP Flash Tool and MTK Droid Tools to successfully make a flashable Stock ROM for our MediaTek devices.

Requirements:
  • Any MTK android device running a Stock ROM. (Note: if your device was rooted, then you'll get a rooted Stock ROM, otherwise if your device does not have root access, you'll get unrooted Stock ROM):

MT6595, MT6592, MT6589, MT6582, MT6577, MT6575, MT6572, or any MT65xx


Preparations (Please Read):

Make sure to prepare all the necessary requirements before proceeding or else, proceeding below is just a waste.

You must have the device in hand with CWM recovery. Download and install the MTK USB Drivers in your computer, it contains 6 other USB drivers needed to detect your device. Also, you must download MTK Droid Tools and SP Flash Tool, extract them to any location or folder you are comfortable of accessing. If all are ready, let's proceed to the instructions.


Instructions:

Creating Stock ROM Backup


First, reboot your MTK android device into CWM Recovery and connect your device to your computer using USB Cable.

cwm recovery

From your computer, Open MTK Droid Tools.exe, run it as administrator. Wait for your device to be detected since you have installed the USB drivers. You will notice that color on the lower-left corner of the tool will turn cyan-blue.

mtk droid tools

On MTK Droid Tools, click on root, backup, recovery tab and click the Backup button to start full stock ROM backup.

mtk backup

Wait for the tool to backup your whole Stock ROM. You can see that the ROM backup will be saved on \MtkDroidTools\backups.

backup android

Wait until a prompt will appear asking you "Pack-up the backup" or something like that, press NO, it will just compress the backup you have made and what we need is the uncompressed ROM backup.

Check the status message and check is the task is completed. "Task ended".

It is not done yet, we have to prepare this backup to make it flashable through SP Flash Tool. To do it, click on To prepare blocks for Flash Tool.

flash backup

A new windows will appear asking fol a .md5 file of the backup. So navigate to the MTK Droid Tools folder where your backup is found. Open the backup that your have created earlier and select the files.md5 click OPEN.
flash rom backup

Wait for MTK Droid Tools to copy the files for SP Flash Tool, check the status messages until the copying is complete.

stock rom backup

When the tool is done, you have now created the Stock ROM backup of your device!


How To Restore the Stock ROM of your MTK device?


Open SP Flash Tool.exe, run as administrator. Load the scatter file (click scatter-loading) which you have prepared from MTK Droid Tools to be flashable through SP Flash Tool. It can be found in the !Files_to_FlashTool folder of your Stock ROM backup (only if you have just made a backup) or from where you have saved or placed the Stock ROM. But in my case, I saved it on !Files to FlashTool folder.

sp flash tool scatter

After you loaded the scatter file, it will look like the image below. All must checked except for Cache and User Data, and most importantly, do not check Preloader and DSP_BL or else you'll brick it. Those checked partitions will be restored, make sure not to touch or move the backup files so that your phone will be restored in your previous stock ROM, also to avoid boot loops and bricking.

As you can see, the Stock ROM partition backups are found on its specific locations under location column. If the locations do not appear (except for CACHE and USRDATA), the backup stock ROM is not in the proper place. To fix that, you must move the files of the stock ROM to the same location where the Scatter file is stored.

To restore or flash the Stock ROM backup, first, turn OFF your MTK android device and remove the USB cable. If your phone was already turned OFF, click Download from SP Flash Tool, a prompt will appear, just click YES. Immediately connect your turned OFF device to your computer via USB Cable.

download rom

Wait for the tool to detect your device and restore the Stock ROM that you have made. An alert with a green circle appears after successfully downloading the ROM.

download ok

Done! You have successfully restored the stock ROM.


Monday, May 19, 2014

How To Make / Flash CWM Recovery Without Rooting

CWM No Root

Can't get ClockworkMod (CWM) recovery for your MediaTek device?


Getting a locally branded smartphone neither a tablet relatively gets a low number of developer for our device, that's why most android users can't really enjoy much of there devices. But thanks to XDA developers who contributed a lot to MediaTek device development,  we at least solve some of our problems like getting root and porting a custom recovery like ClockworkMod for our own devices.

Going back to your problem, if you can't find a good resolution to your problem of getting a CWM recovery ported for your device, now, I have a way to fix your problem. Even though I have created an article previously regarding how to flash CWM recovery to any device with root-required, this article that I will show you does not require you root access anymore which is great!


You can create / make your own CWM recovery to any of your MediaTek device!


Well, with this guide that I will provide you, you will learn how to make your own and flash ClockworkMod (CWM) recovery to any of your MediaTek devices. All you have to do is to carefully follow the steps so you can successfully do it well without problems.


How To make your own CWM Recovery and flash it without rooting your MTK android device using MTK Droid Tools and SP Flash Tool.


Requirements:
  • Any MediaTek android device with ext4 type of block (rooted or not rooted, it doesn't matter):

MT6595, MT6592, MT6589, MT6582, MT6577, MT6575, MT6572, MT65xx

Instructions:

First, you have to prepare all necessary requirements and place it to the location where you are comfortable with. Download and install the MTK USB Drivers, wait for it to close itself because it includes 6 kinds of MTK USB drivers. Also, extract MTK Droid Tools to where you want it. You also need the scatter file for your device, you can easily make it yourself by just following the guide from the link and most importantly, make sure that you have your stock boot image for your device which we will use for creating the CWM recovery. If you don't have it, you have to follow the link above.

cwm need

Make sure that USB Cable is disconnected or unplugged. Open MTK Droid Tools.exe (run as administrator) and go to root, backup, recovery tab. (if UBIFS warning appeared in the status message, this process will not work for you. Only ext4 supported.)

mtk droid tools

From the root, backup, recovery tab, the radio button To choose the boot.img file was selected by default. All you have to do is click on Recovery and Boot button.

mtk cwm recovery

After clicking Recovery and Boot button, a new windows will appear asking where is your existing boot.img. In my case, I placed it on my Tools folder. Now, select and open the boot.img of your android device.

stock boot image

Wait a few seconds and a prompt asking To make CWM recovery automatically will appear. Click YES.

cwm recovery

Wait for the task to get completed, read the status messages on the right pane. If the task was successful, go to MTK Droid Tools -- recovery folder to check if the patching was done well. There will be two files, first is the patched boot image and the second is the recovery image which is the ClockworkMod (CWM) recovery.

recovery

Now that you have the CWM recovery already, we will proceed to flashing it through SP Flash Tool. Why? if you don't have root access, then use SP Flash Tool, otherwise if you are already rooted, use mobile uncle to update your recovery image.

To flash CWM recovery without rooting your android device, open SP Flash Tool.exe (run as administrator). Click on Scatter-loading, then find and open the Scatter file of your android device.

scatter file

Now, the regions of your device will be loaded. You are only to flash the CWM recovery that you made earlier so click on Recovery. Navigate to MTK Droid Tools -- recovery folder and select the recovery image which is the CWM recovery that we have made earlier.

flash recovery

Make sure that RECOVERY is the only one that checked. Now we will start flashing the recovery.

Also, make sure that the USB Cable is unplugged from your device. Now you nee to turn off your android device (shutdown or remove the battery). When your device was already powered off, from SP Flash Tool click Download , select YES then immediately connect your device to your computer via USB Cable.

sp flash tool

Your device must be detected even it is turned off since you have installed the MTK USB Drivers from the requirements. You'll notice that your android device was detected after you'll see the blue and red color loading on SP Flash Tool's status.

Wait for the download to be done. If done, it will look like the image below:

sp flash tool download

To verify if you have successfully flashed CWM Recovery on your unrooted android device, unplug or disconnect the USB Cable from your device and try to reboot to recovery (use the combo keys or rebooter app).

Congratulations!! You have successfully flashed ClockworkMod recovery on your unrooted android device.


How To Make / Backup Stock Boot and Recovery Image

Can't get stock Boot and Recovery image for your MediaTek android device?


Optimizing your android device takes a risk which either may improve your device a lot more or either make it perform worst. Now, most of the android users who encounter problems with their android device have difficulty to fix it. Why? Most beginners on android tweaking has the lack of knowledge on the proper way to backup their android devices' software, so whenever they encounter such issues to their device, they have the hard time looking of for a resolution especially if their device doesn't have much developers.

stock boot recovery image
Good news for MediaTek android users because this article will provide you the way how to solve your problems with your android devices' Stock Boot.img and Recovery image which you could use if something bad might happen, and you can use it to create a CWM recovery to do flashing stuffs and do full ROM backup.

You can create / make your own stock boot.img and recovery.img for your MTK android device and use it as backup!


Yes, you don't have to depend for others or ask for them how to make one 'cause you can create your own stock boot.img and recovery.img for your MediaTek (MTK) devices by just following this long but simple steps that I will provide you.

Usually, you can't access the root system without Superuser rights that is why I made this article to help you with that.


How to get Stock Boot and Recovery image for any MediaTek device without root using SP Flash Tool and MTK Droid Tool


Will work any MediaTek device such as:

MT6595, MT6592, MT6589, MT6582, MT6577, MT6575, MT6572, MT65xx

Requirements:
Instructions:

Let us prepare for our tools first (that you have downloaded above). Install MTK USB Driveryou have to install all drivers included there, also, extract MTK Droid Root and Tools, SP Flash Tool to any location you are comfortable. 
Make sure that you have made the Scatter File for your device (create your own using the link from the requirements above)

scatter file

Connect your android device to your Windows computer, make sure you have installed properly all the drivers from MTK USB Drivers to avoid interruptions during this process. From your device, you must also enable USB Debugging on your device Settings -- Developer options, now your device must be auto-detected by your computer, if not, please properly install the USB drivers. It is also better if you set your android device to Airplane Mode.

Run SP Flash Tool.exe as administrator (right-click on it). After opening, click Scatter-loading.
sp flash tool

Locate the scatter file of your android device. In my case, I have MT6577 from MyPhone a848i. Open and load the scatter file of your android device to the SP Flash Tool.

mt6577 scatter file

It will look like the image below. Now, click Read Back tab.

smart phone flash tool

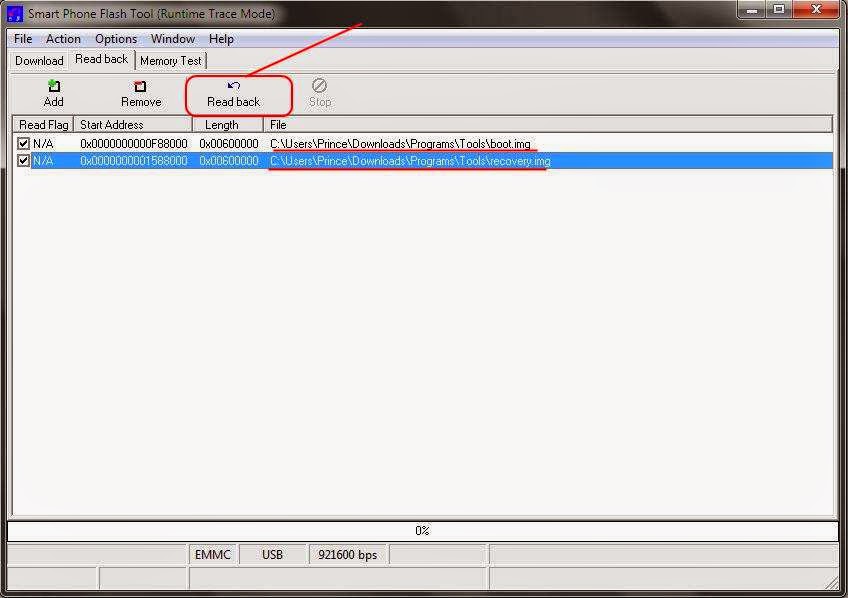
From Read Back tab, click ADD twice so that we can add two tasks. Why? One is for getting the boot.img and the second one is for recovery.img. We can use them as stock backups and we can also use it as a basis for flashing CWM custom recovery and making a full ROM backup or dump.

spf tool

Now, we will start the process. Let's start with the boot.img, double-click the first N/A.
boot image

A new window will appear asking to save the file. Name it as boot.img then click Save it to where you want to put the stock boot.img.

stock boot image

This is the most crucial part. You must enter the proper hex valuse for the Start Address and the Length for the boot image or else all you have done will not work. 

flash boot image


To find out what to enter on the Start Address, first, find the scatter file that you have created before and edit/open it using Notepad ++ editor. Enter the hex code of BOOTIMG, in my case, my hex code is 0xf88000.

boot.img

To find out what to enter on Length, connect your device to your computer via USB cable, make sure to enable USB Debugging from your device, then open MTK Droid Tools.exe on your computer and wait until your device was detected. From MTK Droid Tools, click Block Map.

Find the row for bootimg and you'll notice that it has the same start address "0000F88000" from what we have from the scatter file above "0xf8800" (you'll see that the first 4 zeroes are replaced by "0x"). 

Now to get the Length, length is equal to the Size but what we will enter is the significant digits only. In my case, since the size is 0000600000, the significant digit is 600000 and we have to replace the first 4 zeroes with "0x", so what we will enter in the Length from the SP Flash Tool is 0x600000

block info

Now, in my case, it will look like this:

flash boot.img

Make sure that the Start Address and Length has the same count or number of characters, otherwise, add a zero. For example you have a start address of 0x1234567 and you have a length of 0x123456, since they are not the same in count, you have to add zero on the length, so the length now will be 0x0123456. We have to add zero just in order to have the same character count.

If you are done getting the hex values, press OK.

Setting for boot.img is done, next will be for the recovery.img.
Double click on the second N/A, name it as recovery.img and save it to where you want to store the stock recovery.

recovery.img

Again, we have to enter the proper hex values for Start Address and Length.
flash recovery

You have to open again the Scatter file of your device and load your device from MTK Droid Tools to check the block map just like what we did on the boot.img.

recovery image

In my case, my recovery has a Start Address 0x1588000 as you can see from the notepad, and I have the size of 000060000 from the block info, we will replace the first four zeroes with "0x" to get the Length, so my Length will be 0x600000.

Since you have got the values, you have to enter it on the SP Flash Tool then press OK. Refer to the image below:

sp flash recovery

Now it is all set upped, you can see the locations where your boot and recovery image will be stored after we do the process. 

Unplug the USB cable from your device and turn off your android device (you can do proper shutdown or remove the battery). When your phone is already turned off, press the Read back button from SP Flash Tool and immediately plug-in your phone with USB Cable.

boot recovery image

Wait for 3-5 seconds and SP Flash Tool will detect your android device and it will load and create the stock boot and recovery image for your device. An OK alert message with a green circle will popup when the process is successful.

Navigate to the location where you have set the files to be store. In my case, you can see below that I have done it well. The boot image and the recovery image has the same file size.

boot.img recovery.img

Why they have the same file size? Let's check the block info from the MTK Droid Tools.
boot recovery size

As you can see, both boot and recovery image has the same file size around 6mb therefore our file is correct.

We are now done from creating Stock images and we can use it to create a ClockworkMod (CWM) recovery and do full Stock ROM backup.

Friday, May 16, 2014

Easy Steps To Make Android Scatter File

What is Scatter File?

Scatter file, in android terms, is a file used to describe the loads of regions in a specific android device running MediaTek's ARM architecture. Usually, SP Flash Tool needs scatter files to read its loads to revive an android from bricking or for other flashing stuffs. Read Microsoft Glossary for more info.

If you have worries and confusions on how to create or make your own scatter file for your android devices, this article might at least help you to solve it.

scatter file

Easy steps how to make a scatter file for any MTK android device

The steps are applicable for android devices with:

Mediatek MT6595, MT6592, MT6589, MT6582, MT6577, MT6572 chipsets

To create a scatter file, we have to prepare all the requirements to ensure we can successfully make one without any trouble. In this case, we need:

  • Any MTK android device with USB cable
  • Windows computer
  • Download and extract MTK Droid Tools
  • ADB Drivers - you don't have it? Just Download and install PdaNet
Procedure:
  1. From your android device, enable USB debugging. Check if it is enabled on your device Settings - Developer options
  2. Connect your android device to you computer via USB cable. Drivers must be loaded automatically since you have drivers installed from PdaNet.
  3. From your computer, run MTK Droid Tools application as administrator (except for Windows XP).

  4. Wait for MTK Droid Tools to load your android device's info. Just wait few seconds.
  5. If the tool is done loading your device, click Blocks Map.

  6. A new window will appear, click Create scatter file.

    • Now, navigate to where do you want to save the scatter file of your device. Save it to somewhere safe because it can be used for future flashing.


      • Done. 


      Monday, April 28, 2014

      MTK Droid Tools: Root, Recovery, Backup Any MediaTek Devices

      MTK Droid Tools


      As Mediatek smartphone chipsets have gained its popularity in the market not only due to its performance but also for its affordability, many users tend to buy these smartphones. However, most MediaTek devices nowadays were produced locally. The problem is the limits bound to these devices when it comes to tweaking such as rooting, installing custom recoveries and more, due to lack of developers for their device.

      What is MTK Droid Tools?

      Fortunately, rua1, an XDA member, created MTK Droid Tools for Windows from this main thread which enables users to root, apply custom recovery and backup any MediaTek devices in a very simple and easy way. Its package also contains ADB Shell which allows to apply commands from a Computer to any MediaTek device. This tool can also restore IMEI, reveal your phone's true specs and discover more. This is a very excellent tool which should be a must have apps if you own a MediaTek device. Check out his main thread discussion or by just directly get this amazing tool here.

      MTK Droid Tools is tested working on MT6592, MT6582, MT6589T, MT6589T, MT6577, MT6575, MT6572 and any other relevant MTK CPU / SoC.